
0
Owner's of the Sharp Computer Monitor Sharp PN-L802B LCD Monitor gave it a score of 0 out of 5. Here's how the scores stacked up:

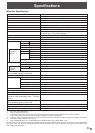


57
E
• Wheninstalling,removingormovingthemonitor,ensurethatthisiscarriedoutbyatleast6people.
• Besuretouseawall-mountbracketdesignedordesignatedformountingthemonitor.
• Thismonitorisdesignedtobeinstalledonaconcretewallorpillar.Reinforcedworkmightbenecessaryforsomematerials
suchasplaster/thinplasticboard/woodbeforestartinginstallation.
Thismonitorandbracketmustbeinstalledonawallwhichcanendureatleast4timesormoretheweightofthemonitor.
Installbythemostsuitablemethodforthematerialandthestructure.
• ToattachaVESA-compliantmountingbracket,useM6screwsthatare5/16inch(8mm)to3/8inch(10mm)longerthanthe
thicknessofthemountingbracket.
• Aftermounting,pleasecarefullyensurethemonitorissecure,andnotabletocomeloosefromthewallormount.
• DonotuseanyscrewholesotherthanVESAholesforinstallation.
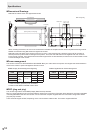
Mounting Precautions
(For SHARP dealers and service engineers)
n
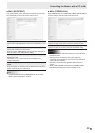
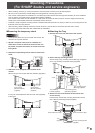
Removing the temporary stand
Caution
• Thetemporarystandisonlyforusewiththismonitor.Do
notuseitforanyotherdevices.
1. Spread a soft thick cloth (such as a blanket) on a
stable level surface on which the entire monitor can
be placed, and place the monitor on it with the screen
facing down.
2.Removethestandxingscrewsandthenremovethe
stand.
3. Attach the cover (supplied) onto the back of the
monitor.
Secureusing2coverscrews(M4withwashers)(supplied).
Cover screws
(M4 with washers)
(supplied)
Cover screws
(M4 with washers)
(supplied)
Ifatraywillnotbeattached,afxthecoverseal(supplied)
tothecover.
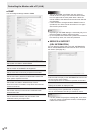
n
Attaching the Tray
1. Remove the cover from the back of the monitor.
2. Secure the tray mounting bracket.
Secureusing2traymountingscrews(M5long)(supplied)
and1traymountingscrew(M5short)(supplied).
(1)
(2)
(3)
Tray mounting
bracket (supplied)
Tray mounting screws
(M5 long) (supplied)
Cover
Tray mounting screw
(M5 short) (supplied)
3. Attach the cover onto the back of the monitor and
secure the tray.
Insertthetrayintothetraymountingbracketandsecure
with2M4traymountingscrews(supplied).
Tray
(supplied)
M4 tray mounting screws
(supplied)
Screw removed in step 1
Screw removed in step 1


Find Your Products By Category
Please Login
